
Key takeaways
- Stand the butt on a level stand or blocks so a watering can fits under the tap
- A full 200-litre butt weighs about 200kg, so the base must be firm and level
- A diverter kit sends overflow back down the downpipe, so nothing floods the base
- Measure your downpipe before buying the diverter, as round and square pipes differ
- Keep the lid on to stop algae, leaves and mosquitoes
- Use mains water for seedlings and butt water for established plants
Installing a water butt is a simple afternoon job. You stand the butt on a raised base beside a downpipe, cut a short section out of the pipe and fit a diverter. After that, every shower tops up a supply of free water for the garden.
This is the hands-on fitting guide: choosing a butt, raising it, cutting the pipe, fitting the diverter and tap, linking butts and keeping the water clean. If you’re still weighing up tanks, roof areas and bigger systems, start with our overview of rainwater harvesting for UK gardens.
Which water butt should you buy?
For most house downpipes, a standard 200-litre round butt is the easy choice. Pick a slimline one for a narrow side passage, or a small 100-litre butt for a shed.
| Butt | Best for | Good to know |
|---|---|---|
| 100 litre | Sheds, small yards, tight corners | Fills fast, so link a second later |
| 200-210 litre round | A standard house downpipe | Best value for the space |
| 250 litre slimline | Side returns and passages | Sits flat against the wall |
| Two butts linked | Bigger roofs and greenhouses | Doubles storage without one huge tank |
Think about footprint as much as size. Slimline butts are taller and flatter, so they suit narrow spaces. Round butts hold more for the money but stick out further. If you’d like something prettier than black plastic, our guide to decorative water butts and rain chains has ideas.
A bigger butt is rarely wasted. As a rough guide, each square metre of roof gives about a litre for every millimetre of rain, so even a shed roof refills a butt quickly.
Why a water butt needs a stand
Standing the butt straight on the ground is the classic mistake. The tap ends up too low for a watering can, and you’re left scooping water out with a jug.
Raise the butt so the tap sits about 30cm up. A purpose-made stand does this neatly. Two or three concrete blocks or stacked paving slabs work just as well.
The base matters as much as the height. A full 200-litre butt weighs about 200kg. Set the stand on firm, compacted ground or a slab, and check it’s level both ways with a spirit level. A butt that leans can sink further on soft ground and may topple, which matters around children and pets.

A couple of blocks lift the tap high enough for a watering can. Get this right now and you’ll never have to fix it.
Tools and parts you need
Gather everything before you cut anything. The one item you’ll need to buy specially is the rainwater diverter kit.
Tools: a hacksaw, a cordless drill, a hole saw or spade bit to suit the tap (check the tap’s instructions), a spirit level, a tape measure and a pencil. A file or sharp knife cleans up the cut edge.
Parts: the butt, a stand or blocks, a diverter kit, a tap and washers if not already fitted, and a lid. Add a linking kit if you plan a second butt.
Gardener’s tip: Measure your downpipe before you buy the diverter. Round and square pipes need different kits, and sizes vary. A diverter that doesn’t fit leaves you with a cut pipe and nowhere to go.
How to fit a water butt and diverter, step by step
Don’t cut the pipe until the butt is in place and you’ve marked the height. Follow your kit’s instructions for exact measurements, as they vary.
1. Position the butt and mark the pipe
Stand the butt on its base right beside the downpipe and check it’s level. Most kits want the diverter at about the height of the butt’s top inlet, so water runs down into it. Hold the diverter against the pipe and mark the cut lines with a pencil, all the way round.
2. Cut the downpipe
Cut the pipe at your marks with a hacksaw, removing the section the kit asks for. Keep the saw square so the cut is flat. File off any burrs so the diverter sits snugly.

Mark the pipe all the way round, then cut square. Safety glasses keep plastic dust out of your eyes.
3. Fit the diverter
Push or clip the diverter into the gap, joining the top and bottom sections of pipe. Connect its short hose to the inlet on the butt.
The clever bit is the automatic overflow. Once the butt is full, water backs up and simply carries on down the downpipe to the drain. No extra overflow pipe is needed.

The diverter bridges the gap in the pipe. A short hose carries water across to the butt.
4. Fit the tap
Many butts come with a tap already fitted. If yours doesn’t, drill the hole low on the front using the size the tap instructions give. Push the tap through with its washer on the outside, then add the inner washer and back nut. Hand-tighten only. Overtightening squashes the washer and can cause drips.
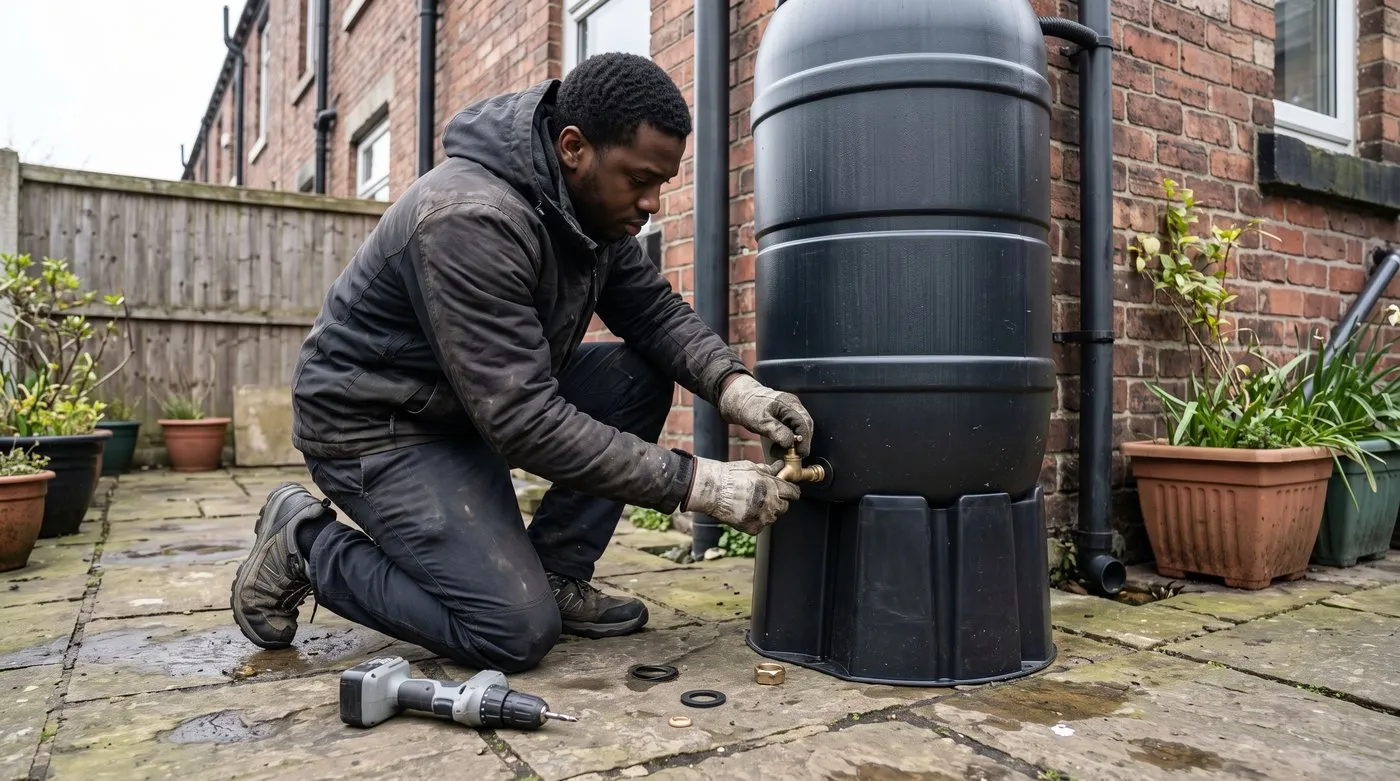
Washer on the outside, back nut on the inside, and hand-tight is tight enough.
5. Test it
Tip a bucket of water down the downpipe, or wait for rain. Check the butt fills, the tap doesn’t drip and the overflow runs back down the pipe. Then put the lid on.
How to link two water butts together
A linking kit joins two butts near the base so they fill and empty as one. It’s the easiest way to store more water.
- Stand both butts at the same height, on level bases, side by side.
- Drill a hole low on the side of each, using the kit’s instructions.
- Fit the connectors and washers, then join them with the hose.
- Water now fills the first butt and flows across into the second.
Once both are full, the diverter overflows back down the pipe as usual. You can add a third butt the same way. Draw water from whichever tap is handiest, as the levels stay equal.

Linked butts share one water level, so stand them at exactly the same height.
Where should water butt overflow go?
With a diverter kit, overflow goes back down the downpipe to the drain, just as it always did. Nothing pools around the base.
If your butt fills from the top of a cut pipe instead, it needs an overflow hose running to a drain, soakaway or second butt. Never let it spill onto the base. Standing water softens the ground, and a heavy butt can sink and lean.
After the first heavy rain, check the overflow runs freely and the base stays dry.
How to use water butt water
Use it on established plants, pots and borders. Rainwater is soft, so acid lovers such as camellias, blueberries and rhododendrons enjoy it, especially in hard-water areas.
For seedlings and young plants, stick to mains water. Stored rainwater can carry fungal diseases that cause problems for tiny plants.
Butt water is a real help in dry spells and during a hosepipe ban, so use it first and save the tap for backup. Our guide on how to water your garden properly shows how to make every can count.

This is the payoff for raising the butt: a can fills straight from the tap with no stooping.
How to keep water butt water clean
Keep the lid on, keep debris out and give it a scrub once a year. That’s all it needs.
Light lets algae grow and turn the water green, so keep the butt covered. A tight lid also stops mosquitoes laying eggs and leaves dropping in. Fit a leaf filter in the diverter to catch moss and grit from the roof.
Once a year, in late winter when you’re using little water, empty and scrub the butt with a stiff brush and rinse it out. Skip bleach and detergents, as traces can harm plants. If the water smells stale, check the lid and filter first.

Kept dark under a lid, stored rainwater stays clear like this.
Winter care for a water butt
Lower the level before hard frosts, drain the tap and keep the lid on. Ice can crack a tap or split a seam on an older butt.
Many people simply switch the diverter to its “off” setting in late autumn, so the butt stops filling. Drain the tap after use in frosty spells, or wrap it in pipe lagging. In spring, check for splits and leaks before you rely on it again.
Water butt calendar through the year
| Month | Task |
|---|---|
| January to February | Empty and scrub the butt while it’s little used. Check for frost damage |
| March | Switch the diverter back on. Check the tap and hoses |
| April to May | Clear the leaf filter. Add a second butt if one runs dry |
| June to August | Use butt water first in dry spells. Keep the lid on |
| September to October | Autumn rain refills butts fast. Clear falling leaves from the filter |
| November to December | Clear gutters. Lower the level and drain the tap before hard frost |
Common water butt mistakes
Standing it on the ground. The tap ends up too low for a can. Always raise it about 30cm.
A soft or sloping base. A full butt weighs about 200kg and will sink or lean. Use firm, level ground and check with a spirit level.
The wrong diverter. Round and square downpipes need different kits. Measure before you buy.
Leaving the lid off. The water goes green and attracts mosquitoes. Keep it covered.
Using butt water on seedlings. Use mains water for tiny plants and save butt water for established ones.
Frequently asked questions
How do you install a water butt on a downpipe?
Stand the butt on a firm stand, then fit a diverter into the downpipe. Mark the pipe at the height the kit asks for, cut it with a hacksaw and fit the diverter. Connect the hose to the butt, fit the tap and test with a bucket of water.
How high should a water butt stand?
High enough for a watering can to fit under the tap, usually about 30cm. Use a purpose-made stand, concrete blocks or paving slabs. Make sure the base is level and firm, because a full butt is very heavy.
Do I need an overflow pipe on a water butt?
Not if you use a diverter kit. Once the butt is full, water carries on down the downpipe to the drain as before. A butt filled from the top of a cut pipe needs an overflow hose to a drain or second butt.
How much rain does a water butt collect?
Quite a lot, even from a small roof. As a rough guide, every square metre of roof gives about a litre of water for each millimetre of rain. A shed roof can fill a butt after one or two wet days.
Can you link two water butts together?
Yes, with a linking kit that joins them near the base. Stand both at the same height so the water levels match. They then fill and empty as one, and you can add a third the same way.
How do I stop algae growing in my water butt?
Keep the lid on so no light gets in. Fit a leaf filter in the diverter to keep debris out. Empty and scrub the butt once a year to clear silt.
Should I empty my water butt in winter?
Not completely, but lower the level before hard frosts. Many people switch the diverter off over winter and drain the tap. Plastic butts usually cope, but a split tap is a common winter casualty.
Is water butt water safe for seedlings?
It’s best to use mains water for seedlings and young plants. Stored rainwater can carry fungal diseases that cause problems for tiny plants. It’s fine for established plants, pots and borders.
With your butt in place, read our guide to garden water conservation for more ways to stretch every drop, or find more projects on the how-to hub.
Our team produces practical UK gardening guidance from source research, contributor records and established horticultural practice. Editorial standards are overseen by Matt W.


