Key takeaways
- Most fence repairs are simple DIY jobs with a drill, spirit level and the right fixings
- Hang panels on clips, not nails, so they can flex a little in the wind
- A concrete spur saves a post that's only rotten at the base, with no digging out
- Posts need 600mm in the ground, so use 2.4m posts for a 1.8m fence
- Gravel boards stop panels sitting on wet soil and rotting
- Check the fence every autumn and fix a lean before the winter storms
Every fence needs a bit of first aid sooner or later. Wind loosens posts, rain rots timber, and a small lean becomes a collapse after the next storm. The good news? Most fence repairs are simple, cheap and easy to do yourself with basic tools.
Below you’ll find how to swap a blown panel, save a leaning post, fix a snapped rail and keep the timber in good shape. If you’re starting from scratch, our guide to garden fence ideas covers styles and materials.
How to work out what’s wrong
Walk the whole fence and note every problem before you buy anything. Most damage is one of five things, and each has its own fix.
Rotten posts are the most common problem. Push a screwdriver into the post at ground level. If it sinks in more than about 10mm with light pressure, the post is rotten. Rot nearly always starts where the wood meets the soil.

A rotten post at ground level. If a screwdriver sinks in easily, it’s time to act.
Leaning posts mean the concrete footing has cracked or the post has rotted underground. Fix it now, as every gust makes it worse. Check whether the post itself is leaning or the concrete is moving in soft ground.
Cracked or broken panels are usually wind or a knock. Overlap panels are the most likely to go because their flat face catches the wind. In a close-board fence, you can often just replace a single board.
Broken arris rails are the triangular rails that hold up close-board fencing. When one snaps, the boards sag or fall. Cheap metal brackets make this an easy fix.
Greying wood happens to untreated timber outdoors. It’s only skin deep, but it means the wood has no protection from the wet, and untreated fences rot faster.
How to replace a fence panel
This is the most common fence fix. It’s a quick job that needs no special skills.
What you need
- A new panel (measure the gap first, most are 1.83m or 6ft wide)
- Galvanised panel clips or U-brackets (two per post)
- 40mm galvanised screws
- Cordless drill
- Spirit level
- A helper to hold the panel
Step by step
- Take out the broken panel. Lever out nails with a pry bar, or unscrew the clips. Clear away any broken bits.
- While the gap is open, check both posts for rot. Brush preservative onto any bare wood.
- Screw the bottom clips to the posts, just above the gravel board or ground. Check they’re level with each other.
- Lower the new panel into the bottom clips. Get your helper to hold it while you check the top is level.
- Screw the top clips on, snug against the top of the panel.
- Give it a firm shake. A little give is fine, but it shouldn’t rattle or lift.
Tip: Use clips rather than nailing panels to the posts. Clips let the panel flex slightly in the wind, so it’s less likely to crack or pull free.
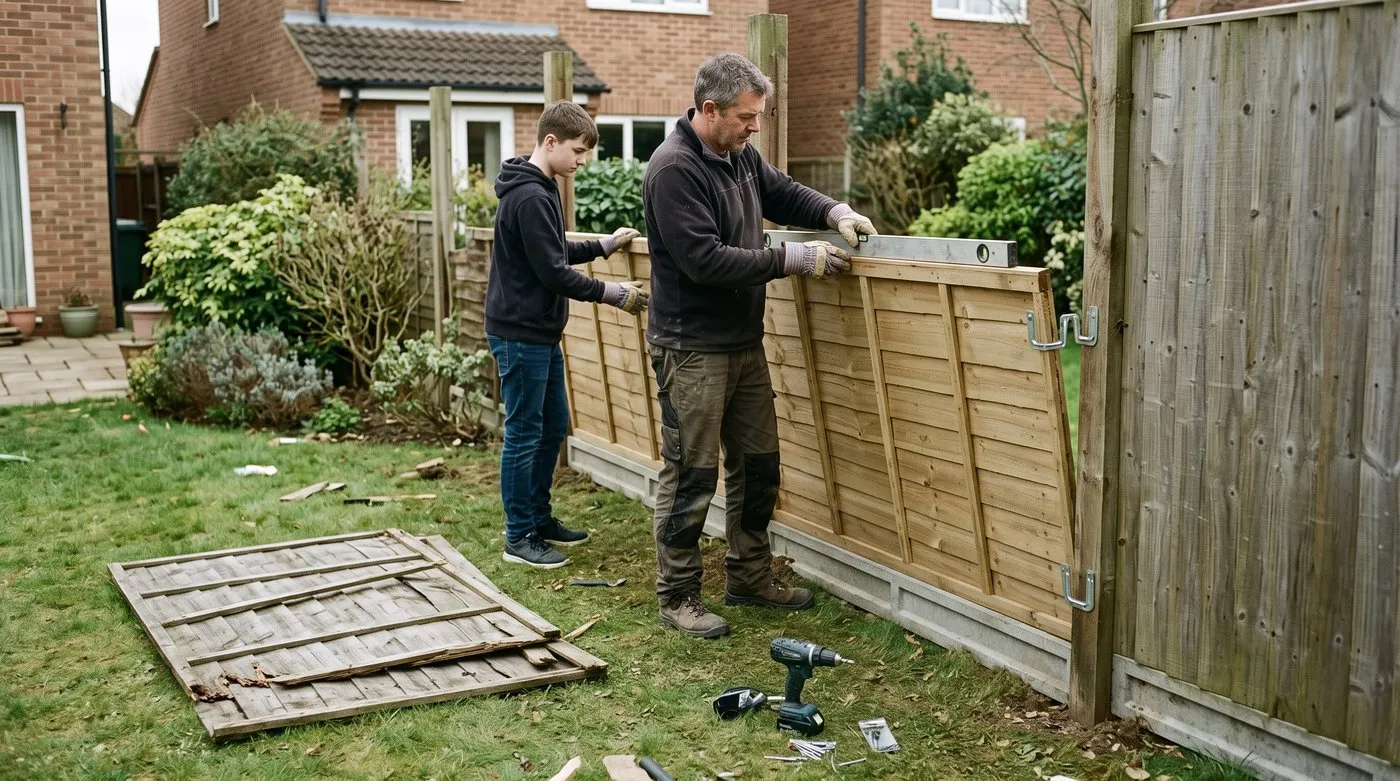
Clips let the panel flex slightly in the wind, so it’s less likely to crack or pull free than one nailed to the posts. A helper makes it a quick job.
How to fix a leaning fence post
A leaning post doesn’t always need replacing. If the wood above ground is sound, you can prop it up or reset it.
Method 1: Bolt on a concrete spur

Setting a post in Postcrete. Allow at least one bag per post and let it harden before hanging panels.
A concrete spur is a short concrete post you set in the ground beside the timber one and bolt through both. The spur does the heavy lifting, and the old post stays put to hold the panels.
You’ll need: a concrete spur, two M10 coach bolts with washers and nuts, a bag of Postcrete, a spade, a 10mm masonry drill bit and a spirit level.
- Dig a hole about 450mm deep beside the leaning post, on the side away from the panels.
- Stand the spur in the hole with its flat face against the post. Check it’s upright.
- Fill the hole about a third full of water, then pour in Postcrete around the spur, following the bag. Hold it straight while it sets.
- Once set, drill two 10mm holes through the spur and the post, about 300mm apart. Push the bolts through, add washers and nuts, and tighten.
- Done. Hang the panels back on the timber post as normal.
Method 2: Straighten and reset the post
If the post has moved in soft ground but the wood is sound, you can reset it.
- Take the panels off both sides.
- Dig around the base to find the old concrete. Chip away any loose bits.
- Push the post upright, checking two sides with a spirit level. Prop it with a length of timber screwed to the post and staked into the ground.
- Add water, then pack fresh Postcrete around the base, filling any gaps.
- Leave the prop on for a day before you put the panels back.
How to replace a fence post completely
If a post has rotted through or snapped at the ground, it needs replacing.
You’ll need: a new 75mm x 75mm or 100mm x 100mm pressure-treated post, two bags of Postcrete, a spade, a spirit level and some old cardboard for the edge of the hole.
- Take off the panels on both sides and prop them safely.
- Dig out the old post and concrete. This is the hard bit. Rock the post back and forth to loosen the concrete, and use a long pry bar to lever it out.
- The new post needs at least 600mm in the ground. For a 1.8m fence, use a 2.4m post.
- Stand the new post in the hole and check it’s upright on two sides. Prop it in place.
- Fill the hole about a third full of water, then pour Postcrete around the post to just below ground level. Hold it straight while it firms up.
- Leave it overnight before fitting panels.
How to fix a broken arris rail
Arris rails are the triangular rails between the posts in close-board fencing. When one snaps, the boards in that section start to sag.
Using arris rail brackets
Galvanised arris rail brackets make this easy. You need one at each end where the rail meets a post.
- Take off the sagging boards. Number them in chalk so they go back in the same order.
- Pull the broken rail pieces out of the posts.
- Cut a new arris rail to length.
- Screw a bracket to each post at the right height. The bracket holds the rail without needing a slot in the post.
- Sit the new rail in the brackets and screw it in.
- Nail the boards back on with 50mm galvanised nails, overlapping each one slightly.
Tip: If only one end has snapped, use one bracket at the broken end and leave the good end where it is.
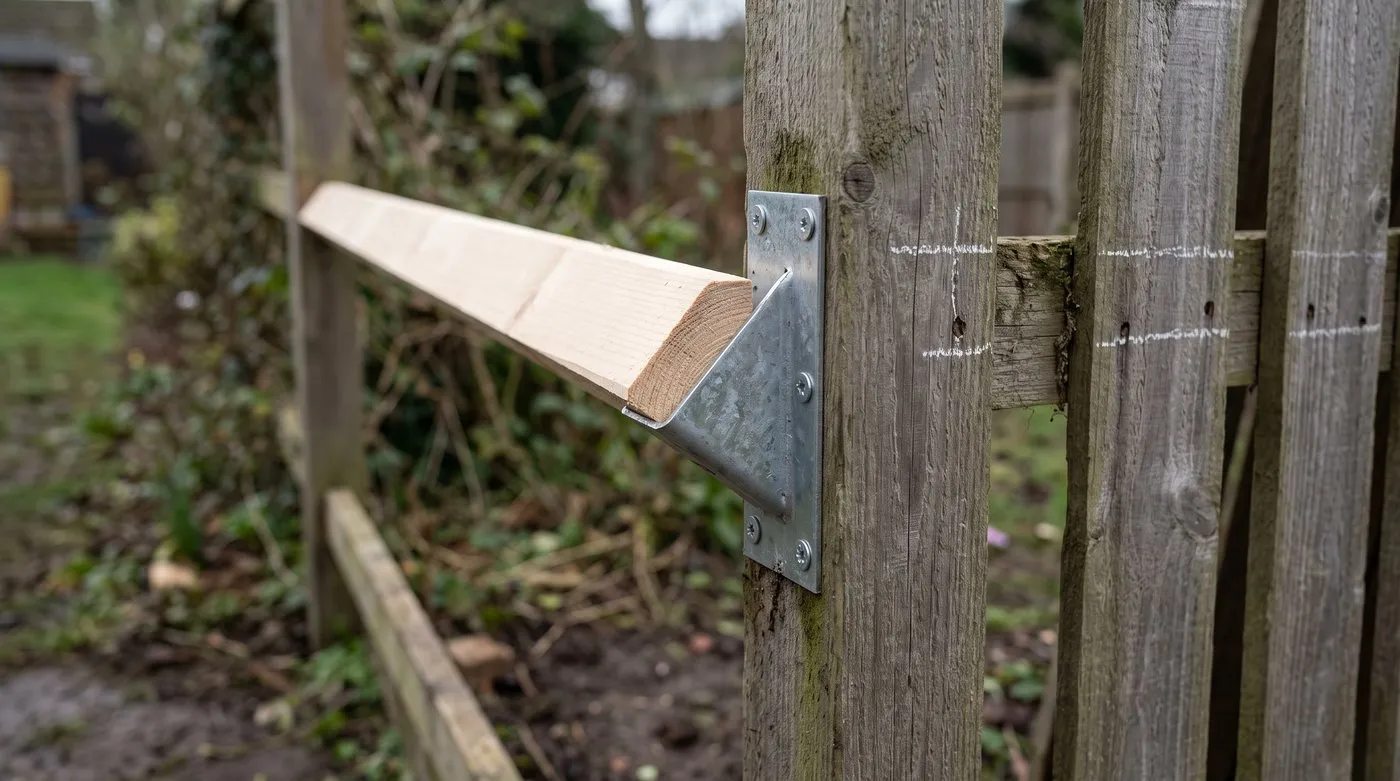
An arris rail bracket holds the new rail without needing a slot in the post. If only one end has snapped, you only need one bracket.
Treating your fence so it lasts
Treating the wood every few years is the best way to slow rot. Our damp climate is just what wood-rotting fungi love.

A pump sprayer gives an even coat. Pick a dry, mild day so it soaks in.
Which treatment to use
| Treatment | Drying | Smell | Best for |
|---|---|---|---|
| Water-based | Quick | Low | Most garden fences |
| Oil-based | Slow | Strong | Rough or older wood, extra protection |
| Creosote substitute | Very slow | Strong | Sheds and farm fencing |
| Pressure-treated (from the factory) | Ready to use | None | New posts, panels and gravel boards |
Water-based treatments are the best all-rounder. They dry fast, don’t smell much and go on with a brush, roller or sprayer. Two thin coats beat one thick one. Many come in colours, and our guide to which fence paint colours add value suggests shades that make a garden look bigger.
Oil-based treatments soak in deeper but take longer to dry and smell strongly. Keep pets and children away until dry, as the label says.
Creosote substitutes give a dark finish like old-fashioned creosote. Real creosote hasn’t been sold for home use since 2003. The substitutes suit sheds and outbuildings better than fences near a patio or play area.
Pressure-treated timber has preservative forced deep into it at the sawmill. It lasts for years without extra treatment. Always buy pressure-treated posts and gravel boards.
What fence repairs cost
Most single repairs cost very little in materials. Paying a fencer costs more because of labour, but it can still make sense if you’re short of time or tools.
| Repair | Materials | DIY time |
|---|---|---|
| New overlap panel | Panel and clips | Under an hour |
| New close-board section | Boards and rails | 1-2 hours |
| Concrete spur on a leaning post | Spur, Postcrete, bolts | 1-2 hours |
| New post | Post and two bags of Postcrete | 2-3 hours |
| New arris rail | Rail and two brackets | Under an hour |
| New gravel board | One board | Under an hour |
| Treat a 10m fence, both sides | One 5-litre tin | 2-3 hours |

A drill, hammer, spirit level and galvanised fixings cover most fence jobs.
If you’d rather get someone in, ask neighbours for a local fencer and get a few quotes.
Is fence damage covered by home insurance?
Often not. Many policies leave out fences, or only cover them in a proper storm. Wear and tear is usually excluded, so a rotten fence that blows over may not count. Check the “storm” and “exclusions” parts of your policy. For a single panel, the repair usually costs less than your excess anyway.
Seasonal fence care calendar
A little care through the year saves big repairs later.
Spring (March to May)
Walk the fence after winter. Check each post for lean and rot, and each panel for cracks. Brush off moss and algae. Late spring is a good time to treat the wood once it has dried out.
Summer (June to August)
Cut back plants growing against or through the fence, as they trap damp against the wood. Train climbing plants onto trellis or wires fixed about 50mm off the fence so air can flow behind. Dry, firm ground makes summer a good time for bigger repairs.
Autumn (September to November)
The most important season. Treat the wood before the winter wet. Tighten loose screws and replace rusty clips. Clear fallen leaves from the bottom of the fence. It’s your last chance to fix things before the storms.
Winter (December to February)
Leave big jobs until the ground dries. If a panel blows out, fit a temporary one or a tarpaulin so the wind doesn’t damage the panels next to it. Check the fence after every storm.
Repair the post or replace it?
Bolt on a concrete spur when only the bottom of the post has rotted, the wood above ground is sound and digging out the old concrete would be a pain. It’s the right fix for most single rotten posts.
Replace it when the post is rotten above ground, has snapped, or several posts in a row have gone. If more than three posts in a row need work, think about redoing that whole stretch.
Prop it for now if you can’t fix it straight away. Screw a length of 50mm x 50mm timber, at least 1.2m long, to the post at an angle and stake it into the ground. It’s not a permanent fix, but it’ll keep the fence up through a storm.
Stopping rot
Rot is a timber fence’s biggest enemy. Rain, damp air and mild winters suit the fungi that cause it.
Where rot starts
Rot starts where water hangs about: the base of the posts, the bottom edge of panels on damp soil, and the ends of rails where they slot into posts. Gravel boards sit along the bottom and take the soaking so the panels above don’t. If you don’t have them, fitting them is one of the best things you can do.
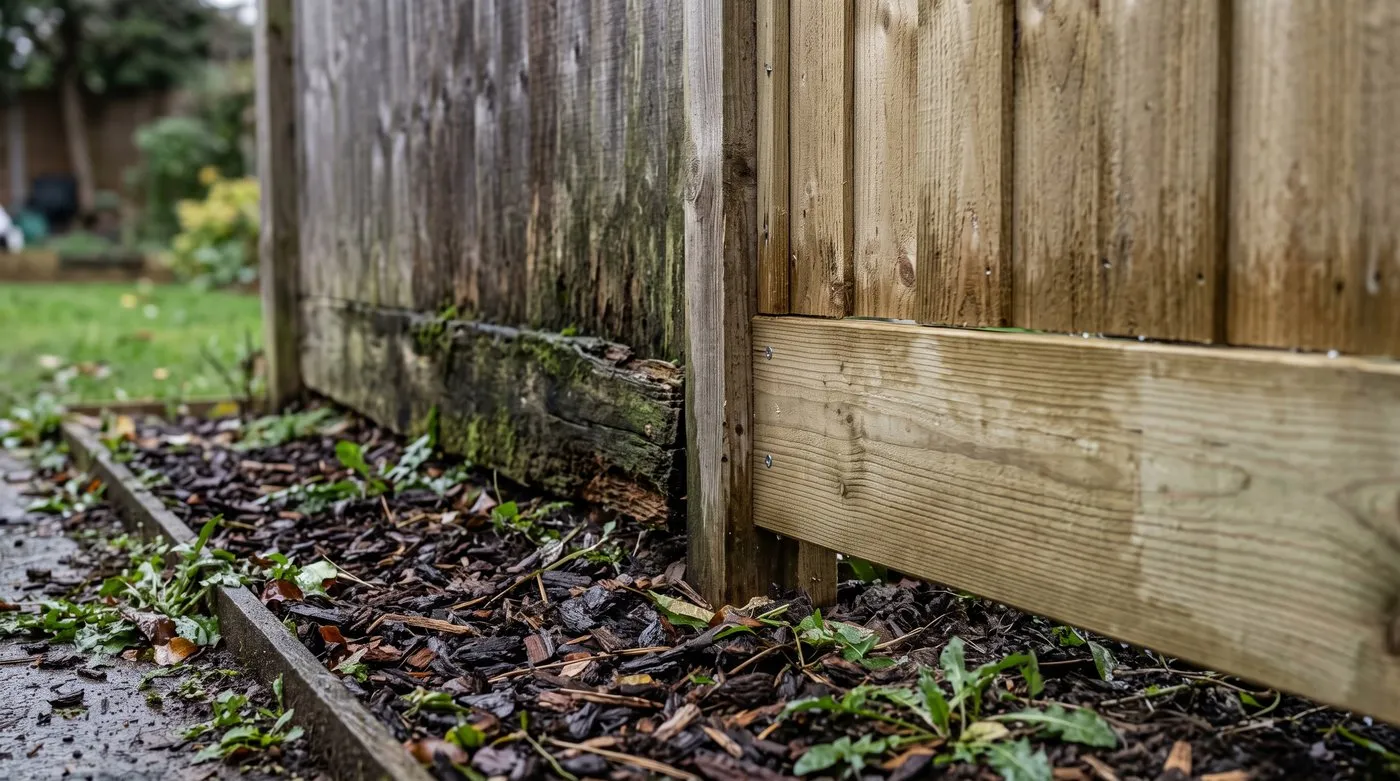
Rot starts where water hangs about, usually the bottom of the posts and panels. A gravel board takes the soaking so the panel above doesn’t.
Fixing small patches of rot
Dig out the soft wood with a chisel until you reach firm timber. Brush on a wood hardener, then fill the hole with exterior wood filler. This is fine for small patches but isn’t a strong repair. If rot has weakened a post, use a spur or replace it.
Keeping rot away
- Fit pressure-treated gravel boards along every run.
- If water puddles round the posts, dig a small gravel-filled soakaway.
- Treat every cut end and drilled hole with preservative, as factory treatment doesn’t reach new cuts.
Common fence repair mistakes
1. Posts that are too thin
Use posts of at least 75mm x 75mm for a 1.8m fence, and 100mm x 100mm on windy sites. Thin 50mm posts bend and fail.
2. Posts not deep enough
A 1.8m fence needs 600mm of post in the ground. A 2.1m post only leaves 300mm underground, and it’ll lean. Use 2.4m posts.
3. No gravel boards
Panels sitting on soil rot from the bottom, even when treated. Gravel boards are the cheapest protection going. In a dog-friendly garden, they also block the gap dogs like to dig under.
4. Treating wet wood
On damp wood the treatment just sits on top and soon peels off. Wait for a couple of dry days. Press a tissue on the wood, and if it picks up damp, wait a bit longer.
5. Ignoring a small lean
Each storm makes a lean worse until the panels drop out. Fix it as soon as you spot it. A spur is far cheaper than a new section of fence.
Fences and the law: boundaries and height
A few simple rules help you avoid a fall-out with the neighbours.
Who owns the boundary fence?
Start with your title register and any older deeds. A T-mark on the plan usually shows which side owns or looks after the boundary. An H-mark (a T on both sides) usually means it’s shared.
Many title plans only show general boundaries and say nothing about fences. HM Land Registry’s boundaries guide explains more. If you can’t find out, treat the fence as shared and agree any replacement with your neighbour. The idea that you always own the left-hand fence is a myth.
How high can it be?
Under permitted development rights, back garden fences can be up to 2m without planning permission. Next to a road used by vehicles, or its footpath, the limit is 1m. Trellis and toppers count, including the rollers and angled toppers used in a cat-proof garden. Conservation areas and listed buildings can have extra rules, so check with your council.
Do you have to maintain your fence?
Usually not. In England and Wales there’s no general duty to keep a boundary fence in repair, unless your deeds include a covenant that says so. Check your deeds before letting a fence fall apart. A council can step in if a fence beside a public road or path becomes dangerous.
Can you paint or repair your neighbour’s fence?
Not without their say-so. If it’s their fence, ask before painting, fixing trellis or making repairs, ideally in writing. If you need to reach your own fence from their side, ask for access first. If they refuse, the Access to Neighbouring Land Act 1992 lets you apply to court for basic repair work. For privacy or climbers against a fence that isn’t yours, put up your own trellis on posts just inside your boundary.
Does the Party Wall Act apply?
Not to an ordinary timber fence. It can apply if you’re building a brick or block wall on a shared boundary, so check before you start.
Handy tools for fence repairs
You don’t need anything fancy. This basic kit covers nearly every job:
- Cordless drill with screwdriver bits and a 10mm masonry bit
- Spirit level (a long one is best for posts)
- Claw hammer
- Pry bar for old panels and nails
- Spade
- Handsaw
- Tape measure
- Gloves and safety glasses for splintery wood
Use galvanised or stainless steel fixings. Plain steel rusts quickly outdoors and leaves black stains on the wood.
When to repair and when to replace the whole fence
Repair if only a few panels or posts are damaged and the rest of the fence is sound, or if you just need it to see out one more winter.
Replace if lots of the posts are rotten, it’s an old fence that’s never been treated, several rails have snapped or the whole run leans. At that point, patching costs more than starting again. For long boundaries, get quotes from local fencers, who can often buy timber more cheaply than you can.
If you’re replacing anyway, why not upgrade? Our guide to garden fence ideas is full of styles and colours to freshen up a tired boundary. If a path runs along the fence, our garden path ideas have plenty of layouts that suit new fencing.
Frequently asked questions
How much does it cost to repair a garden fence UK?
Most single repairs cost very little in materials. A panel and clips, a concrete spur and bolts, or a new arris rail and brackets are all cheap. Paying a fencer costs more because of labour, so get a few quotes for bigger jobs.
Can I repair a fence post without removing it?
Yes, bolt a concrete spur beside it. The spur is a short concrete post set in Postcrete next to the rotten timber one. Two coach bolts go through both, and the spur takes the strain. It works best when only the base has rotted.
How long does Postcrete take to set?
It firms up in about 5-10 minutes. Wait until the next day before you hang panels on it, to be safe. Fill the hole about a third full of water first, then pour the dry mix in around the post and hold it straight while it sets.
What is the best fence treatment UK?
A water-based fence treatment suits most gardens. It dries quickly, doesn’t smell much and cleans up with water. Oil-based treatments soak in deeper but take longer to dry and smell strongly. Buying pressure-treated posts and panels in the first place helps most of all.
Who is responsible for a garden fence UK?
Check your deeds for a T-mark or a note about the boundary. Many title plans don’t show who owns a fence. If you can’t tell, treat it as shared and agree any work with your neighbour. There’s no general legal duty to maintain a fence unless your deeds say so.
How high can a garden fence be without planning permission?
Up to 2m in a back garden. Next to a road used by vehicles, or its footpath, the limit is 1m. Trellis on top counts towards the height. Listed buildings and conservation areas can have extra rules, so check with your council if you’re unsure.
When is the best time to treat a garden fence?
Late spring or early autumn, on a dry, mild day. The wood must be dry so the treatment can soak in, so pick a spell with no rain forecast for a couple of days. Avoid hot midday sun, which dries it on the surface too fast.
How do I stop fence panels blowing out in wind?
Hang panels on galvanised clips or brackets, not nails. Clips let the panel flex a little in gusts instead of cracking. Make sure every post is firm and upright, and fix any lean straight away. On very windy sites, close-board fencing copes better than overlap panels.
Our team produces practical UK gardening guidance from source research, contributor records and established horticultural practice. Editorial standards are overseen by Matt W.