Key takeaways
- Twisted, stunted shoots furred with grey mould are the source of the whole outbreak
- Lift and bin infected plants, bulb and all, the day you spot them
- Check every bulb before planting and throw out any with small black specks or rot
- Plant tulips in November, and keep them out of affected soil for at least three years
- Pots of fresh compost let you keep growing tulips while the soil recovers
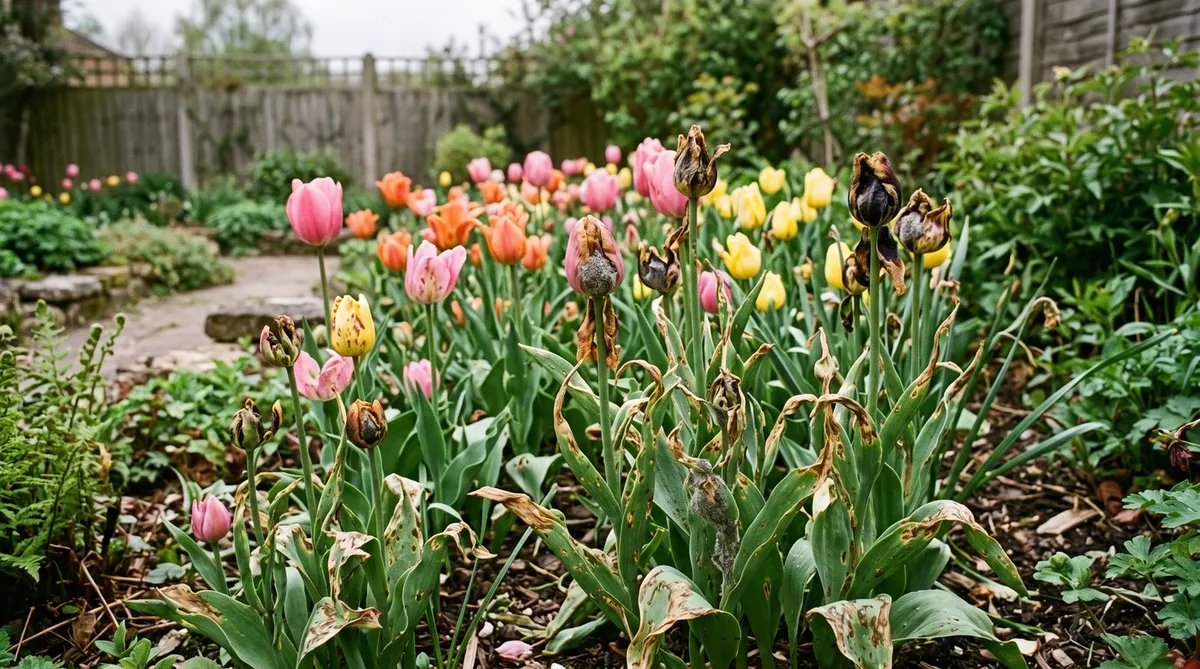
Twisted, scorched shoots and leaves spotted with brown are the classic signs of tulip fire. It is a fungal disease, Botrytis tulipae, and it loves cool, wet springs. There’s no cure for an infected plant, but it is very beatable. Pull out the first sick shoots fast, plant clean bulbs and give the soil a few years off. This guide shows you what to look for and exactly what to do.
What does tulip fire look like?
The giveaway is a shoot that comes up twisted, stunted and scorched, as though someone took a blowtorch to it. In damp weather it grows a grey, fuzzy mould. These first sick shoots grow from infected bulbs, and they are where the trouble starts.
Nearby tulips then pick up small brown or bleached spots on their leaves and petals. In a wet spell the spots spread and join up, the flowers are spoiled and leaves can collapse.
On the bulbs themselves, look for sunken, rotting patches and tiny black specks on or just under the skin. These are the fungus’s resting bodies, called sclerotia, and they are how it survives from one year to the next.
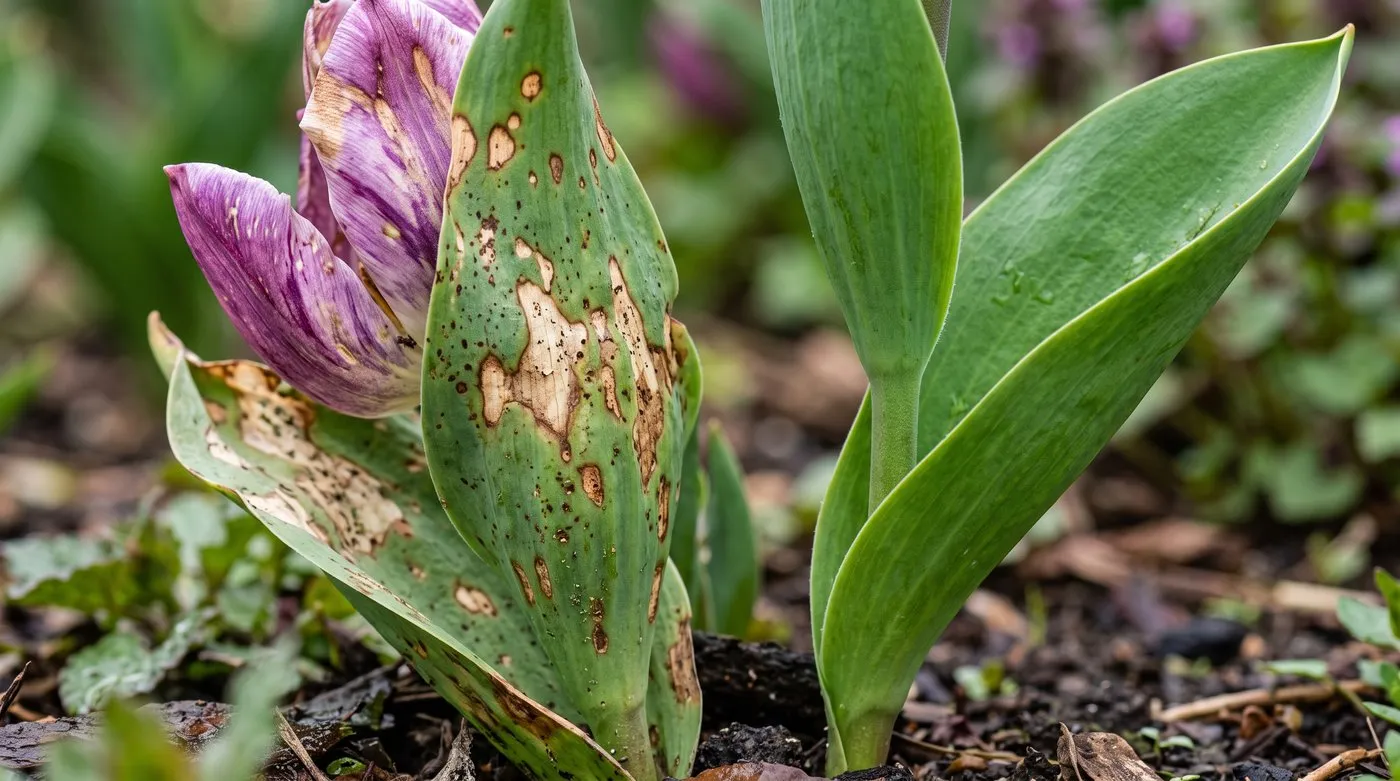
Spotted leaf on the left, healthy leaf on the right. Those brown and bleached spots are spores from sick shoots nearby taking hold.
A different grey mould can rot rose and peony buds too. If those are your problem, see the guide to flower balling in roses and peonies.
How does tulip fire spread?
It starts small. A few infected bulbs send up those twisted, mouldy shoots in spring. Each one sheds spores onto the tulips around it. Given wet leaves and cool, still air, the spores take hold and cause the spotting.
At the end of the season the fungus forms new black resting bodies on the bulbs and in the soil. These can survive there for a couple of years, ready to start again.
The good news hides in that cycle. Only a handful of shoots start each outbreak. Find and remove them within a day or two and the spotting may never get going. Leave them for a week of wet weather and spores are everywhere.
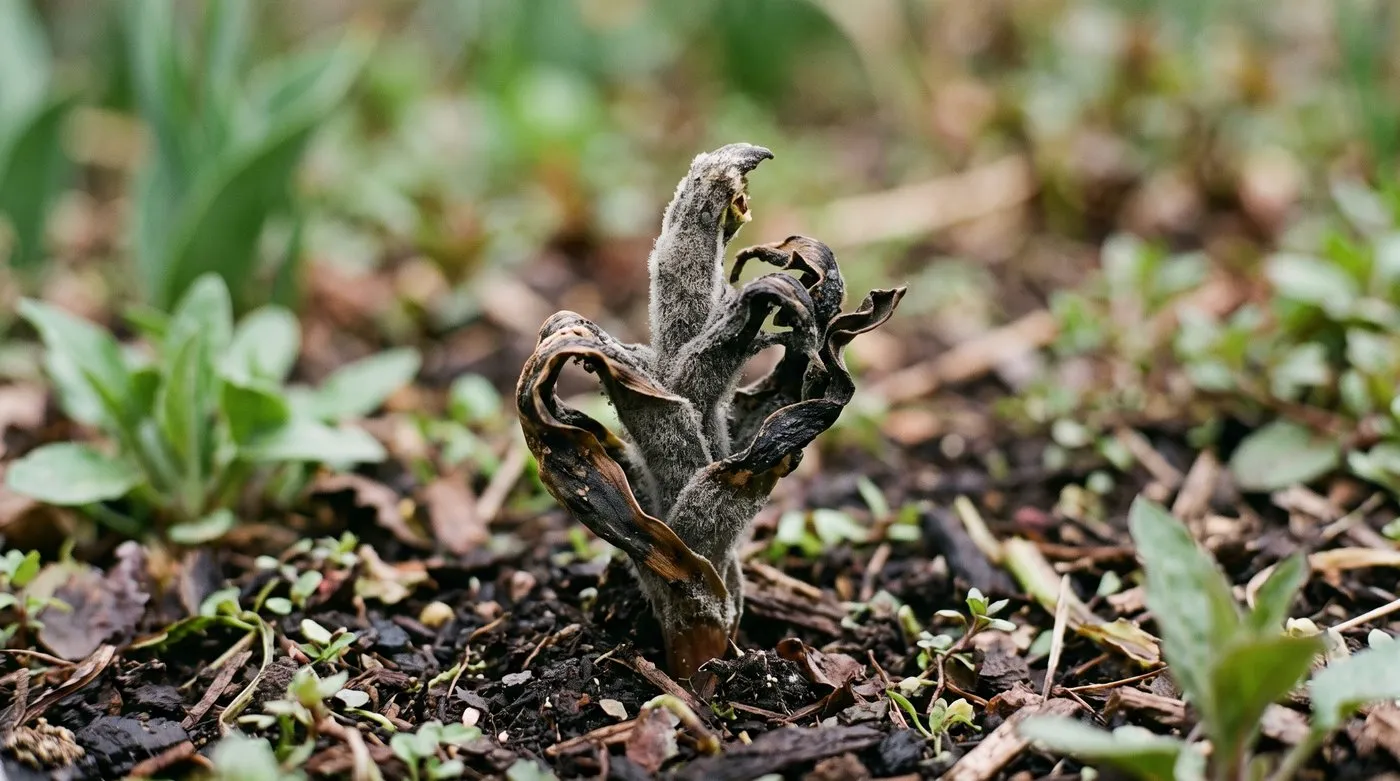
One of the culprits: stunted, twisted and furred with grey mould. Get it out the day you spot it.
How to get rid of tulip fire
Remove the source fast. This one job does more than anything else.
- Check daily. From the moment shoots appear in March, take a quick look at your tulips each day until they finish flowering.
- Lift the whole plant. Any shoot that looks twisted, scorched or mouldy comes out, bulb and all. The bulb holds the fungus.
- Bag it on the spot. Slip it straight into a bag so you don’t shake spores over healthy plants.
- Bin it. Put it in the household waste, never on the compost heap.
- Remove badly spotted plants too during a wet spell, so spores don’t keep building up.
There’s no spray that matches catching those first shoots early. Spotted leaves are a sign the spores have already spread.
Gardener’s tip: Make the tulip check part of your morning cuppa in April. You’re looking for the odd shoot that looks wrong. Two minutes a day keeps the whole bed safe.
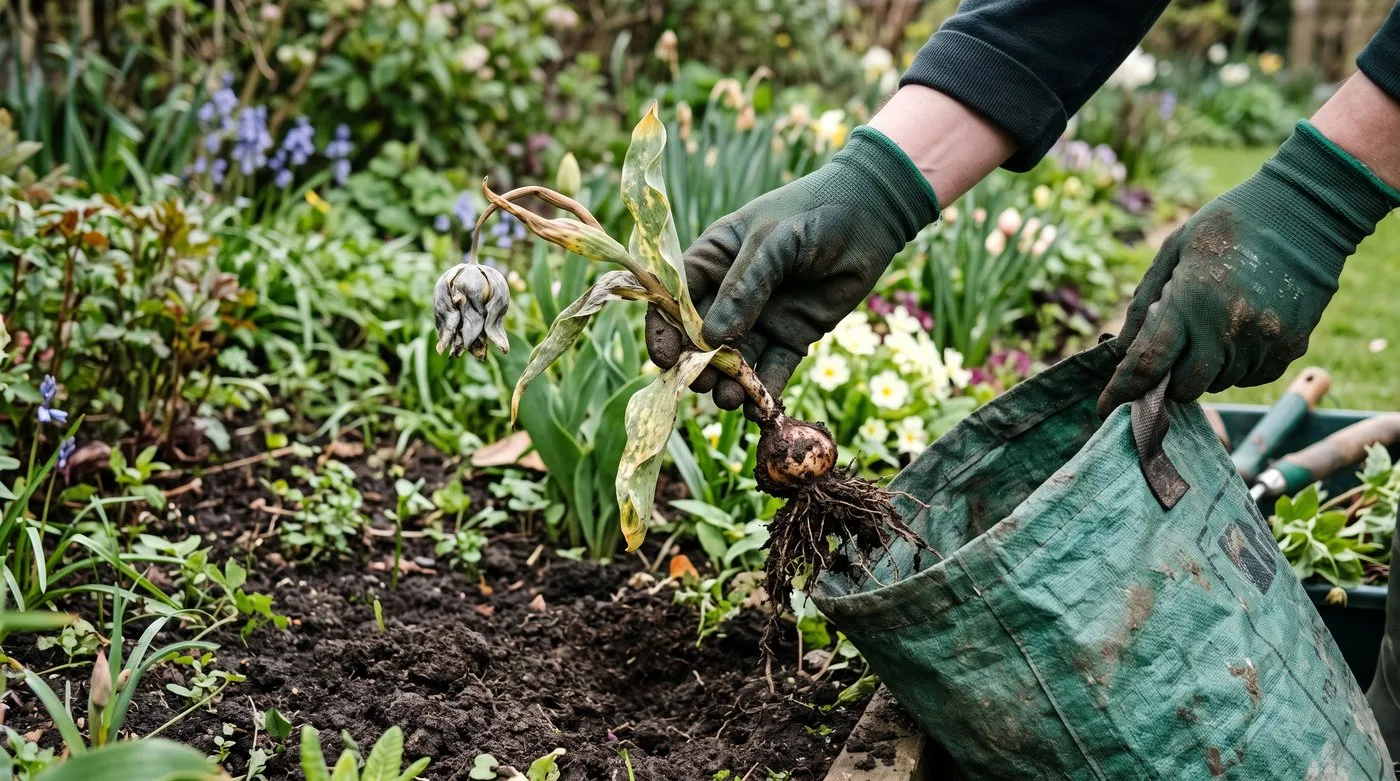
Lift the bulb as well as the leaves, and drop it straight into a bag so spores stay put.
Stopping tulip fire coming back next year
Three simple habits keep the fungus from carrying over.
Check bulbs before planting. Throw out any with black specks, soft patches or a mouldy base. One bad bulb can start next spring’s outbreak. Buy firm, clean bulbs from a reputable supplier.
Plant in November. Tulips planted in late autumn, into well-drained soil, are less likely to get infected. The guide on when to plant tulip bulbs has more on timing.
Give the soil three years off. Don’t plant tulips in ground that had fire for at least three years. Grow something else there and move tulips to a fresh bed.
Clear up after flowering. Deadhead spent flowers and remove dying tulip leaves and debris rather than leaving them to rot in place. The guide to spring bulb care after flowering covers the routine.
Give them space. Close planting keeps leaves wet for longer. Leave room for air to move, and water the soil rather than the leaves.
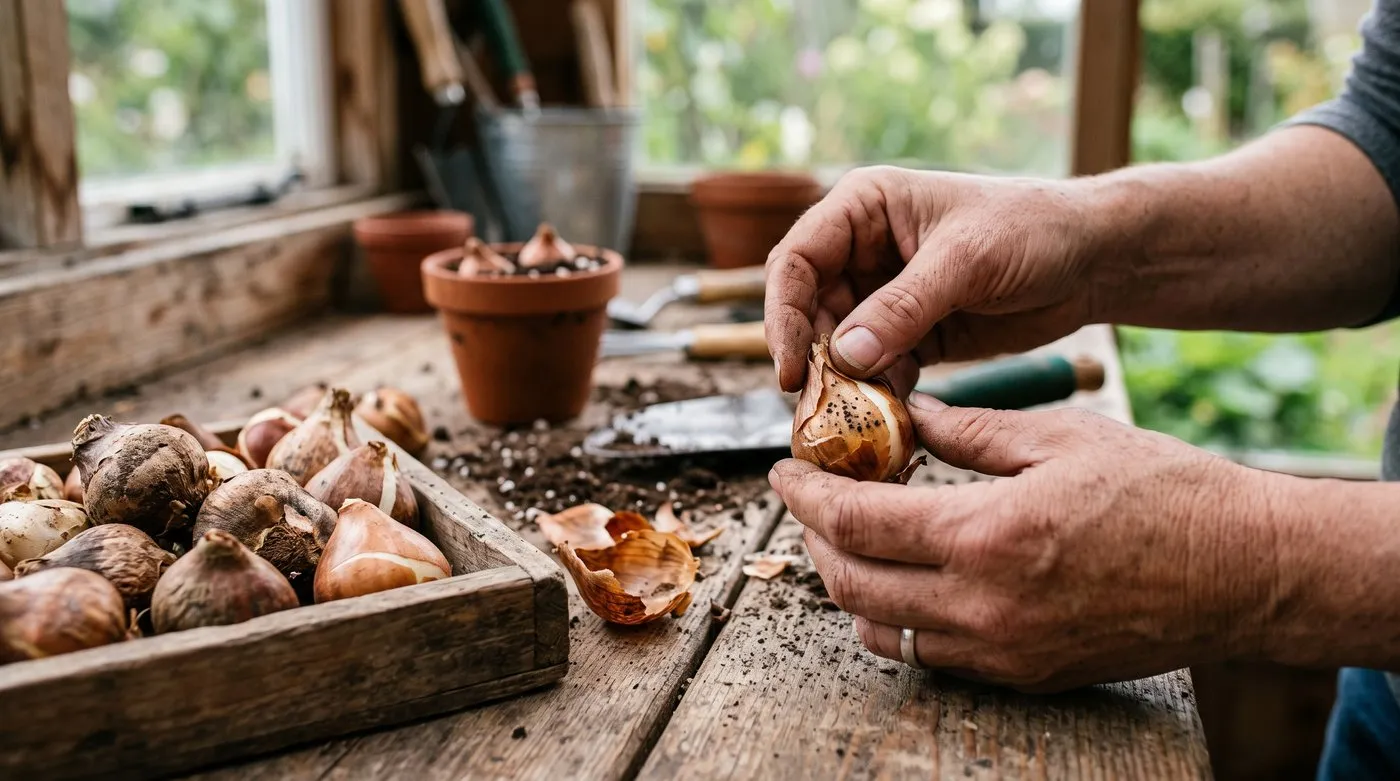
Check every bulb before it goes in. Any with black specks or soft, rotten patches belong in the bin.
Growing tulips in pots after tulip fire
Pots are the easiest way to keep enjoying tulips while your beds have a rest. Fresh compost has none of the fungus’s resting bodies in it.
Use new compost every autumn and tip the old stuff out after flowering, away from your beds. Space the pots so air can move around them, and keep checking the shoots, as spores can still blow in. A layered pot gives a long display, as the guide to bulb lasagne planting shows.

Pots of fresh compost give tulips a clean start each year while affected beds have their three years off.
Tulip fire calendar
| Month | What to do |
|---|---|
| September to October | Buy firm, clean bulbs. Throw out any with black specks or rot |
| November | Plant into fresh ground or pots of new compost, nicely spaced |
| March | Shoots appear. Start your daily check for twisted, mouldy shoots |
| April | Highest risk in wet weather. Lift any sick plant, bulb and all, the day you see it |
| May | Keep checking. Deadhead and remove badly spotted plants |
| June | If lifting bulbs to store, throw out any with black specks. Clear old leaves |
| July to August | Store clean bulbs somewhere dry and airy. Plan where next year’s tulips go |
Storing bulbs over summer? The guide to storing flower bulbs explains how to keep them sound.
Common tulip fire mistakes
Waiting to see if it spreads. By the time spots show everywhere, it already has. Lift sick shoots straight away.
Pulling only the leaves. The bulb carries the fungus. Take the whole plant.
Replanting in the same spot. The fungus waits in the soil. Give it at least three years without tulips.
Composting infected plants. You’ll spread it around the garden. Bin them.
Planting bulbs without looking. One marked bulb can start the whole thing again. Check each one.
For other spring flower troubles, browse the garden problems hub, or see the RHS guide to tulip fire for more pictures.
Frequently asked questions
What does tulip fire look like?
Twisted, scorched-looking shoots, brown spots on leaves and petals, and grey fuzzy mould. Badly infected shoots come up stunted, as if burnt. Healthy tulips nearby then pick up small brown or bleached spots on leaves and flowers.
What causes tulip fire?
A fungus called Botrytis tulipae, which loves cool, wet spring weather. It survives winter as tiny black resting bodies on bulbs and in the soil. In spring these produce mouldy shoots that spread spores to nearby tulips.
Can tulip fire be cured?
No, an infected tulip can’t be cured. Lift and bin infected plants straight away so they stop spreading spores. Then focus on clean bulbs and fresh ground for next year.
Can I plant tulips where I had tulip fire?
Not for at least three years. The fungus survives in the soil for a couple of years, so replanting sooner risks another outbreak. Grow other plants there and put tulips in a new bed or in pots of fresh compost.
Should I remove tulips with tulip fire?
Yes, lift the whole plant, bulb included, and bin it. Pulling only the leaves leaves the fungus in the ground. Bag it on the spot so you don’t shake spores about, and don’t compost it.
Do tulips in pots get tulip fire?
They can, but fresh compost each year lowers the risk a lot. The fungus mainly survives in old soil, so new compost gives bulbs a clean start. Still check bulbs before planting and shoots as they come up.
Are any tulips resistant to tulip fire?
No tulip is fully resistant. Any variety can be hit in a wet spring, especially when planted closely. Clean bulbs, good spacing and fresh ground matter far more than variety.
With clean bulbs and fresh ground sorted, read the guide to growing tulips in the UK for planting depths, care and a brilliant spring show.
Our team produces practical UK gardening guidance from source research, contributor records and established horticultural practice. Editorial standards are overseen by Matt W.


